
Desserts
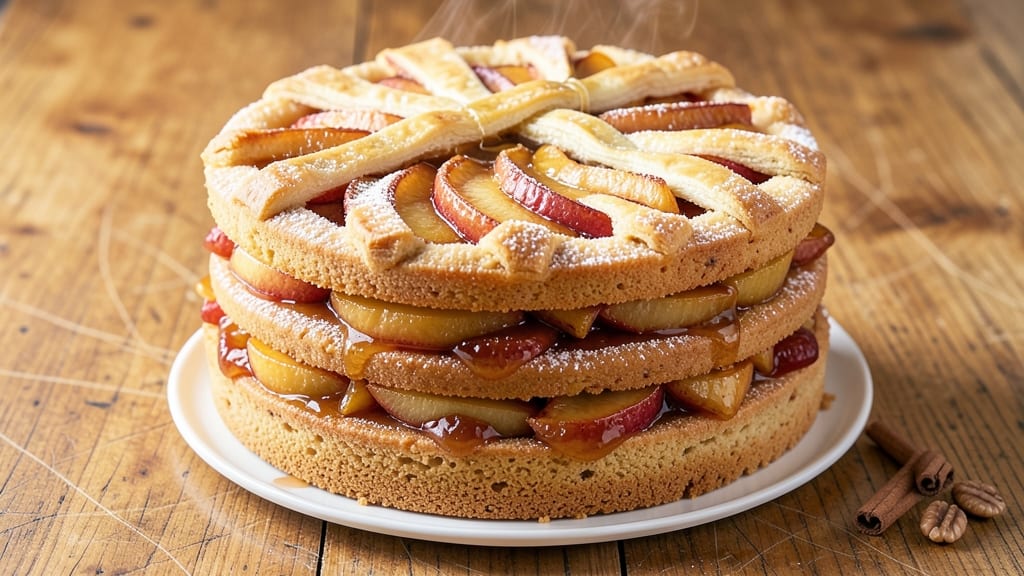
This apple pie layer cake recipe transforms a classic dessert into a showstopping masterpiece with buttery cake layers and spiced apple filling between each. The secret lies in balancing tender cake with perfectly seasoned apples—no soggy layers here.
I’ve perfected this technique over years of baking, ensuring every slice delivers that nostalgic apple pie flavor with the elegance of a layered cake.
The cake itself is rich but not dense, baked to a golden finish that contrasts beautifully with the filling. While the apples simmer down into a thick, aromatic compote, the layers stay crisp enough to hold their shape.
This isn’t your average pie—it’s a dessert that feels special enough for celebrations but simple enough for weeknight treats.
What you’ll end up with is a cake that’s visually stunning—each slice revealing layers of cake and filling in perfect harmony. The spice blend in the apples adds warmth, while the buttery cake provides structure.
It’s the kind of dessert that makes guests ask for the recipe, and the kind you’ll want to bake again and again.
Whether you’re serving it at a holiday gathering or treating yourself to a homemade dessert, this recipe delivers restaurant-quality results with minimal fuss. The assembly process is straightforward, and the final product is worth every minute of baking. Let’s get started!
Ingredients for apple pie layer cake
Buttery cake layers meet spiced apple filling for a showstopper dessert that's perfect for any occasion.
| Ingredient | Amount | Notes |
|---|---|---|
| All-Purpose Flour 🌾 | 3 ½ cups | Sifted for light texture |
| Granulated Sugar 🍚 | 2 ½ cups | White sugar preferred |
| Unsalted Butter 🧈 | 1 ¾ cups | Room temperature, full-fat |
| Large Eggs 🥚 | 4 whole | Room temperature |
| Baking Powder 🧂 | 2 tsp | Aluminum-free preferred |
| Salt 🧂 | ½ tsp | Fine sea salt |
| Vanilla Extract 🍯 | 2 tsp | Pure vanilla preferred |
| Medium Apples 🍎 | 6 whole | Granny Smith or Honeycrisp |
| Brown Sugar 🍚 | ¾ cup | Light brown preferred |
| Ground Cinnamon 🌿 | 2 tsp | Freshly ground preferred |
| Ground Nutmeg 🌿 | ¼ tsp | Freshly grated preferred |
| Lemon Juice 🍋 | 2 tbsp | Freshly squeezed |
| Heavy Cream 🥛 | ½ cup | Whipped for garnish |
| Powdered Sugar 🍚 | ¼ cup | For dusting |
The apples are the heart of this cake. Granny Smith or Honeycrisp hold their shape best when baked, but any crisp variety works. Trader Joe's and Whole Foods usually carry these, but any grocery store will have good options. Avoid mealy apples like Red Delicious—they turn to mush. Peel and core them yourself; pre-sliced apples oxidize fast. For extra flavor, leave the skins on—just scrub them well. If you're short on time, pre-cut frozen apple slices work in a pinch, but drain them thoroughly before cooking.
No vanilla extract? Vanilla bean paste or even vanilla sugar will work—just adjust the amount to taste. The spices are key here: if you don't have nutmeg, allspice at half the amount gives a similar warmth. For the cake layers, King Arthur flour or Bob's Red Mill gives the best texture, but any all-purpose will do. The butter needs to be room temperature—if it's too cold, the cake will be dense. Quick fix: microwave it in 20-second bursts until just soft. And if you're worried about soggy layers, bake the cake one day ahead—it stays fresher that way.
This cake keeps beautifully. Wrap it tightly in plastic wrap and store at room temperature for 2 days, or refrigerate for up to 5 days. For longer storage, freeze the assembled cake (unfrosted) for 3 months
Why You'll Love This Recipe
- No Fuss Layers: I swear by this method—just fold the apples into the batter after mixing the dry ingredients, so no chopping messes up the tender crumb. The butter gets cut into the sugar until it’s almost creamy, but not quite, and that’s the secret to the flaky, buttery texture between layers.
- Cinnamon Bomb Flavor: That first bite? Warm spiced apples with a crackly top, like biting into a pie but with cake’s softness. Honestly, the baking powder keeps it light enough to eat for breakfast, but the sugar caramelizes just enough to taste like autumn in a box.
- Birthday Party Hack: I make this for my nephew’s birthday every year—it’s easy enough to bake ahead (the layers stay fresh for days) and slice into perfect squares. Between us, the kids love the way it’s not too sweet, and the adults? They’ll ask for the recipe before dessert’s even served.
- Budget-Friendly Luxury: Five ingredients, one bowl—this is my go-to when I want to impress but don’t want to break the bank. The butter and sugar do all the heavy lifting, and the eggs bind it so well that even if you halve the recipe, it’s still rich. Leftovers? They disappear faster than I can say “second slice.”
Step-by-step instructions for apple pie layer cake
Here’s how to build this showstopper—moist buttery layers sandwiching spiced apple filling.
Prepare the Cake Layers
Preheat your oven to 350°F and grease three 9-inch round cake pans with butter, then line the bottoms with parchment paper. In a large bowl, whisk together the 3.5 cups all-purpose flour, 2 tsp baking powder, and 0.5 tsp salt. Set aside.
In a separate bowl, beat the 1.75 cups unsalted butter (room temperature) and 2.5 cups granulated sugar on medium speed until light and fluffy—about 3-4 minutes. Add the 4 whole large eggs, one at a time, mixing well after each addition. Scrape down the sides of the bowl, then mix in the 2 tsp vanilla extract.
Gradually add the dry ingredients to the wet, mixing on low speed just until combined. Divide the batter evenly among the prepared pans. Bake for 20-25 minutes, until a toothpick inserted in the center comes out clean. Let the layers cool in the pans for 10 minutes, then transfer to a wire rack to cool completely.
Make the Spiced Apple Filling
Peel, core, and slice the 6 whole medium apples into ¼-inch thick slices. Toss them in a large bowl with the 0.75 cup brown sugar, 2 tsp ground cinnamon, 0.25 tsp ground nutmeg, and 2 tbsp lemon juice. Let the mixture sit for 10 minutes while you prepare the cream filling.
In a small saucepan, combine the 0.5 cup heavy cream and 0.25 cup powdered sugar. Heat over medium-low until the sugar dissolves, then remove from heat and let cool slightly. This will be your binding layer between the cake and apple filling.
Assemble the Layer Cake
Once the cake layers are completely cool, level the tops if needed. Place the first layer on a cake stand or plate. Spread about ¼ cup of the cream mixture evenly over the top, then add a third of the apple slices, pressing down gently. Repeat with the second layer, another ¼ cup of cream, and another third of the apple slices.
For the final layer, spread the remaining cream mixture over the top, then arrange the last of the apple slices in a circular pattern, pressing lightly to hold them in place. Dust the top and sides of the cake with a little extra powdered sugar for a finished look.
Chill and Serve
Refrigerate the cake for at least 4 hours (overnight is best) to allow the flavors to meld and the layers to set. This step is non-negotiable—it’s what transforms this from good to amazing.
Slice with a serrated knife and serve at room temperature. Each bite delivers tender cake, spiced apple, and that perfect buttery cream layer. Store leftovers in the fridge for up to 3 days, bringing to room temperature before serving.
Pro Tips For Making Apple Pie Layer Cake
- CHILL THE BUTTER FIRST: Cold butter makes flaky layers—no one wants a dense cake. Cut your unsalted butter into cubes and pop them in the fridge for 15 minutes before creaming. I learned this the hard way after a batch turned out more like a brick than a cloud.
- WEIGH YOUR FLOUR: Spooning flour from the bag packs it too tightly, throwing off your ratio. Use a kitchen scale for precision—this cake relies on the right balance of flour to sugar. (Yes, even if you’re eyeballing like I used to.)
- BAKE UNTIL 200°F: The cake’s internal temp should hit 200°F before pulling it out—any lower and the center stays gummy. A toothpick test is fine, but don’t trust it alone; the thermometer guarantees doneness every time.
- LAYER APPLE FILLING LAST: Spread the filling between layers after the first one bakes—this keeps the bottom from sogging. Brush warm layers with simple syrup first, then add the apples. (Your cake will thank you.)
Storing and reheating your leftovers
Room-Temp Storage
Your freshly baked cake stays fresh for 2 days at room temperature if wrapped tightly in plastic wrap. I like using clear wrap so I can see the layers—it’s a game-changer for presentation.
Store it in a cool, dark place away from direct sunlight. The cake layers will keep their structure better than if refrigerated immediately. 🌟
For longer room-temperature storage, consider using a cake dome or airtight cake carrier—these help maintain moisture and protect the layers. If you’re serving it at room temperature, let it sit out for 30-60 minutes before slicing for the best texture.
Refrigerator Storage
If you need to keep it for up to 5 days, refrigerate the fully assembled cake in an airtight container or wrapped tightly. The cold helps preserve the cream layer and prevents the apples from drying out.
I always bring it to room temperature before serving—this ensures the cream isn’t icy and the cake slices cleanly. ❄️
Pro tip: Place the cake on a wire rack inside the container to prevent condensation from making the bottom soggy. If the apples look too dry after refrigeration, lightly brush them with a bit of simple syrup (equal parts sugar and water, heated until dissolved) before serving.
Freezer Storage
For maximum shelf life, freeze the unfrosted cake (just the assembled layers) for up to 3 months. Wrap each layer individually in plastic wrap, then place them in a freezer bag with all the air squeezed out. Label the bag with the date—trust me, you’ll forget! 📅
When ready to serve, thaw the cake in the fridge overnight. If you’re short on time, let it sit at room temperature for 2-3 hours. The cream layer may soften slightly, but the cake will still taste amazing. Avoid reheating—this dessert is best enjoyed cold or at room temperature.
Reheating Tips
While this cake is best served chilled, you can gently warm slices if needed. Place them on a microwave-safe plate and heat for 10-15 seconds on low power. Cover with a damp paper towel to prevent drying.
For a stovetop approach, warm slices in a lightly oiled skillet over low heat for 1-2 minutes per side. 🔥
If the cream layer looks too thick after reheating, drizzle a little warm heavy cream or vanilla syrup over the top to restore moisture. Avoid over-heating—the cake should stay tender, not rubbery. Always taste-test before serving!
Nutrition facts
Frequently asked questions
Can I make this cake without three layers?
This recipe works beautifully with just two layers—simply double the filling between them. For a single-layer version, bake only one cake pan and fill it generously with apples. The key is keeping the same 4-hour chill time so the flavors meld properly.
How do I prevent soggy cake layers?
Bake the cake layers one day ahead and store them wrapped at room temperature. This ensures they're completely dry before assembly. Also, use a thin layer of cream cheese frosting (instead of heavy cream) between layers for extra moisture resistance. Chill the cake 4+ hours before serving—this is non-negotiable!
What's the best apple variety for this recipe?
Granny Smith or Honeycrisp apples work best—they hold their shape when baked. Avoid mealy varieties like Red Delicious. For extra flavor, leave the skins on (just scrub them well) or use a mix of Braeburn and Fuji. Pre-sliced frozen apples work in a pinch, but drain them thoroughly to prevent excess moisture.
Can I make this gluten-free?
Yes, but with adjustments. Replace the all-purpose flour with a 1:1 gluten-free baking flour blend (like Bob's Red Mill) and add 1 tsp xanthan gum to the dry ingredients. The cake may be slightly denser, so reduce baking time by 2-3 minutes. For the filling, use gluten-free spices and ensure your sugar is certified gluten-free.
How do I make this cake look more impressive?
Dust the top and sides with powdered sugar for a bakery finish. For extra flair, pipe whipped cream rosettes between the layers or arrange fresh apple slices decoratively on top. Use a serrated knife to slice cleanly, and serve on a wooden cake board with cinnamon sticks as garnish. Presentation matters—this cake deserves to shine!