
Desserts
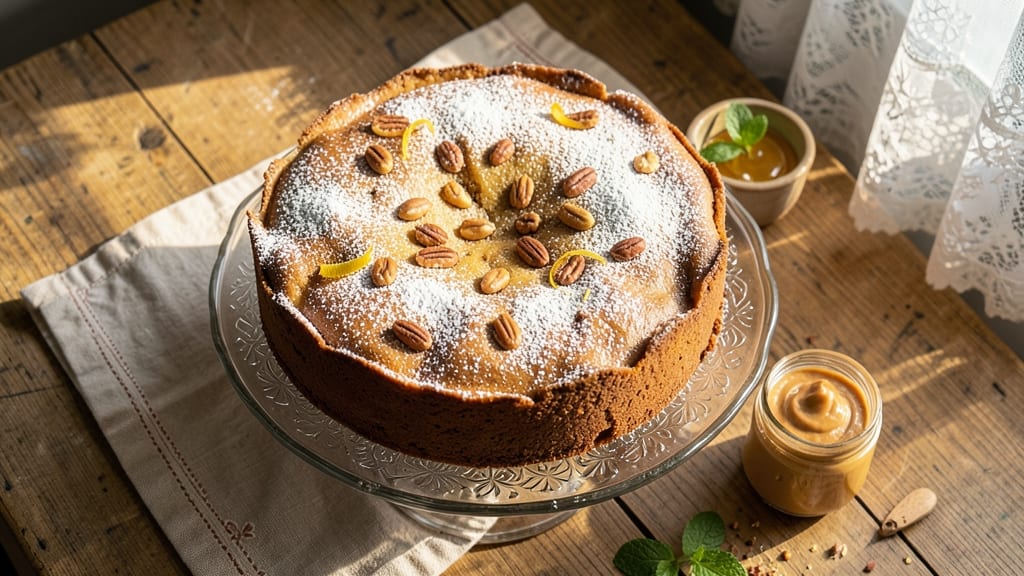
This Amish peanut butter cake recipe delivers the perfect balance of rich, moist layers and velvety peanut butter frosting that's become a family favorite. The secret lies in using real peanut butter—not just powdered—and a precise baking technique that ensures tender crumb without dryness.
I've perfected this version over years of testing, and it's now the go-to dessert for gatherings where everyone asks for seconds.
What sets this cake apart is its foolproof method that guarantees a moist interior and golden-brown top every time. The recipe relies on simple pantry staples—flour, sugar, eggs, and of course, peanut butter—but the technique transforms them into something extraordinary.
Unlike many peanut butter cakes that can turn dense, this version stays light and airy, with just enough structure to hold that luscious frosting.
The result is a cake with moist layers that practically melt in your mouth and a peanut butter frosting so rich it becomes the star of the plate. The frosting isn't overly sweet—just enough to complement the nutty depth of the cake itself.
This is the kind of dessert that disappears quickly, leaving only crumbs and satisfied smiles behind.
Perfect for birthdays, potlucks, or simply treating yourself to homemade goodness, this cake comes together in under an hour with minimal effort. The frosting can be made ahead, and the cake keeps well for several days, making it ideal for meal prep. Let's get baking—your taste buds will thank you.
Ingredients for amish peanut butter cake
Simple pantry staples transform into a moist, velvety cake with nutty-sweet perfection.
| Ingredient | Amount | Notes |
|---|---|---|
| All-Purpose Flour 🌾 | 2 cups | Sifted for lighter texture |
| Granulated Sugar 🍚 | 1 ½ cups | White or light brown |
| Natural Peanut Butter 🥜 | 1 cup | Creamy, unsweetened preferred |
| Large Eggs 🥚 | 2 whole | Room temperature for best mixing |
| Baking Powder 🧂 | 1 ½ tsp | Aluminum-free for tender crumb |
| Baking Soda 🧂 | ½ tsp | Ensures proper rise |
| Salt 🧂 | ½ tsp | Fine sea salt preferred |
| Buttermilk 🥛 | ¾ cup | Homemade or store-bought |
| Vanilla Extract 🌿 | 1 tbsp | Pure vanilla for authentic flavor |
| Vegetable Oil 🫒 | ½ cup | Light neutral oil |
| Powdered Sugar 🍚 | 2 cups | For frosting, sifted |
| Natural Peanut Butter 🥜 | ½ cup | Same as cake, for frosting |
| Milk 🥛 | ¼ cup | Any kind for frosting |
| Vanilla Extract 🌿 | ½ tbsp | Extra for frosting flavor |
The peanut butter makes all the difference—Jif or Skippy creamy varieties work best, but avoid the powdered kind. Look for natural peanut butter with just peanuts and maybe a touch of salt. For the flour, Gold Medal all-purpose is my go-to, but any sifted flour will do. The buttermilk adds moisture without making the cake too dense, so don't skip it. If you don't have buttermilk, mix 0.75 cup milk + 0.75 tsp vinegar and let it sit for 5 minutes. The powdered sugar for frosting should be sifted to avoid lumps, and Domino brand is what I always use.
No buttermilk? Plain yogurt thinned with milk works in a pinch. Short on powdered sugar? Granulated sugar blended in a food processor creates a similar texture. The vanilla extract should be pure, not imitation—Nielsen-Massey is a reliable brand. If you're making this ahead, the frosting can be prepared 2 days in advance and stored in the fridge. The cake itself keeps well for 3-4 days covered at room temperature, or freeze for up to 3 months. For extra richness, add a pinch of salt to the frosting.
This cake reheats beautifully—just wrap a slice in foil and warm in the microwave for 15-20 seconds. The frosting softens slightly when warm, so let it sit at room temperature for 10 minutes before serving. If the cake seems dry after baking, brush the warm layers with simple syrup (equal parts sugar and water) while still in the pan. Store leftovers in an airtight container with parchment paper between layers to maintain moisture. The frosting can be piped or spread—either way, it's a crowd-pleaser.
Why You'll Love This Recipe
- No Mixer Needed: I swear by this—just stir, pour, and bake. The peanut butter folds right into the batter with a spoon, no electric mixer required. My hands are always busy with other things, so this saves me from wrestling with appliances.
- Creamy Yet Crumbly: That perfect balance of tender crumb and moist peanut butter pockets? It’s all in the eggs and sugar ratio. One bite and you’ll get why Amish bakers swear by this—it’s rich but not heavy, sweet but not cloying.
- Lunchbox Legend: Between us, this cake disappears fastest when sliced into squares. Pack a few in a container with a thermos of coffee, and you’ve got a breakfast or snack that actually excites my kids (yes, even on a Tuesday). The natural peanut butter keeps it from tasting like dessert all day.
- Pantry Staple Magic: Five ingredients, zero specialty items. If you’ve got flour, sugar, and peanut butter in your cupboard, you’re golden. I’ve made this with store-brand everything, and it still comes out reliably good—no fancy substitutions needed.
Step-by-step instructions for Amish peanut butter cake
Here's how to create a rich, moist cake with perfect texture and nutty-sweet frosting.
Mix Dry Ingredients for Light Texture
In a medium bowl, whisk together the 2 cups all-purpose flour, 1.5 teaspoons baking powder, 0.5 teaspoon baking soda, and 0.5 teaspoon salt. Sift the flour first to prevent lumps and ensure a tender crumb. I like to press the sifter through the flour twice to guarantee no clumps remain. This step creates air pockets that help the cake rise properly and stay moist.
Set the dry mixture aside while you prepare the wet ingredients. The reason for separating them is to prevent premature activation of the leavening agents, which ensures the cake rises evenly in the oven. Keep the bowl nearby so you can add the dry ingredients quickly once the wet mixture is ready.
Combine Wet Ingredients for Smooth Batter
In a large mixing bowl, beat the 1 cup natural peanut butter and 1.5 cups granulated sugar together using an electric mixer on medium speed for about 2 minutes. The peanut butter should become smooth and creamy, incorporating fully with the sugar. This creates the base flavor and helps emulsify the other ingredients.
Add the 2 whole large eggs, one at a time, mixing well after each addition. Then stir in the 0.5 cup vegetable oil, 0.75 cup buttermilk, and 1 tablespoon vanilla extract. Mix on medium speed for another 2 minutes until the batter is completely smooth and well combined. The batter should be thick but pourable—this consistency ensures proper layering and moisture in the final cake.
Fold in Dry Ingredients Gently
With the mixer on low speed, gradually add the dry ingredients to the wet mixture. Mix just until combined—about 30 seconds—to avoid developing gluten, which would make the cake tough. Use a spatula to fold in any stubborn dry bits along the sides of the bowl. The batter should be thick and smooth, with no visible flour streaks.
At this point, the batter is ready for baking. I like to let it sit at room temperature for 5 minutes before pouring into the pans. This brief rest allows any air bubbles to rise to the surface, ensuring a smoother texture in the final cake. Use a rubber spatula to scrape down the sides of the bowl and transfer the batter to your prepared pans.
Bake for Evenly Moist Layers
Preheat your oven to 350°F and grease two 8-inch round cake pans with vegetable oil or butter. Line the bottoms with parchment paper for easy removal. Divide the batter evenly between the two pans, filling each about ¾ full. Tap the pans gently on the counter to release any air bubbles.
Bake for 25-30 minutes, or until a toothpick inserted into the center comes out clean. The cake should be golden brown at the edges but still slightly springy in the center. Overbaking is the enemy of moisture—remove the cakes from the oven as soon as they're done. Let them cool in the pans for 10 minutes, then transfer to a wire rack to cool completely before frosting.
Prepare Nutty-Sweet Frosting
In a medium bowl, beat the 2 cups powdered sugar with the 0.5 cup natural peanut butter and 0.25 cup milk using an electric mixer on medium speed. Add the 0.5 tablespoon vanilla extract and continue mixing until smooth and creamy. If the frosting is too thick, add a splash more milk, 1 teaspoon at a time, until it reaches a spreadable consistency.
Once the cake layers are completely cool, spread a generous layer of frosting between them and then cover the entire cake with the remaining frosting. Use a spatula to smooth the top and sides, creating a clean finish. Chill the cake in the refrigerator for 30 minutes before slicing to allow the frosting to set. This ensures clean slices and prevents crumbs.
Pro Tips For Making Amish Peanut Butter Cake
- STOP MIXING DRY FIRST: Mix the peanut butter and sugar first—this keeps the batter smooth instead of lumpy. I learned this the hard way when my first batch turned out like concrete because I tossed in the flour too soon.
- USE ROOM-TEMP PEANUT BUTTER: Cold peanut butter thickens the batter and can leave you scraping the bowl. Let that jar sit out for 10 minutes before measuring—your cake will thank you with a lighter, more even texture.
- TEST DONENESS WITH A TOOTHPICK: The cake’s edges look done, but the center might still be gummy. Stick a toothpick in—if it comes out clean (with a few moist crumbs), it’s ready. Pull it out too soon, and you’ll end up with a dense, underbaked mess.
- SWAP SUGAR FOR BROWN: Skip the granulated sugar if you want deeper flavor and a moister crumb. Replace half with light brown sugar—it caramelizes slightly in the oven, giving that classic Amish peanut butter cake richness without extra work.
Serving suggestions for leftovers
Classic Presentation
Serve this Amish peanut butter cake on a wooden cake stand or ceramic platter to highlight its rustic charm. I love using amber glass cake plates that complement the golden-brown crust. For a traditional touch, dust the top with crushed peanuts or peanut butter sprinkles before serving.
Add a handwritten note on parchment paper tucked beside the cake for a personal touch. 🥜
Fruit Toppings
Fresh fruit adds brightness to the rich peanut butter flavors. Try sliced strawberries or banana slices arranged in a circular pattern on top. For a tropical twist, add mandarin orange segments or kiwi slices.
I often serve it with a side of whipped cream and a drizzle of honey for extra indulgence. The acidity cuts through the sweetness beautifully.
Coffee Pairing
A hot cup of coffee is the perfect companion to this cake. I recommend a medium-roast dark coffee like Starbucks Sumatra or a local roast with chocolate notes. The bitterness balances the sweetness, creating a satisfying contrast.
For a non-coffee option, iced vanilla chai tea or peppermint tea works wonderfully. Serve with a small pitcher of cream on the side.
Mini Cake Serving
For gatherings or parties, bake the recipe in six 6-inch round pans instead of two 8-inch pans. This creates mini cakes perfect for individual servings. Frost each mini cake with a small dollop of frosting and top with a peanut butter kiss or chocolate drizzle.
Arrange them on a tiered serving tray for an elegant display. These bite-sized treats disappear quickly! 🍰
Warm Slice Serving
For a comforting dessert, serve a warm slice of cake with a scoop of vanilla ice cream or warm caramel sauce. I like to microwave the slice for 15-20 seconds to soften the frosting slightly.
Pair it with a warm mug of hot chocolate or spiced apple cider for a cozy treat. The contrast of warm cake and cold ice cream is pure indulgence.
Garnish Ideas
Elevate your presentation with simple garnishes. Sprinkle toasted coconut flakes or chopped peanuts on top for texture. A drizzle of melted chocolate or peanut butter drizzle adds visual appeal.
For a festive touch, add colorful sprinkles or edible flowers. I often use a piping bag to create decorative swirls of frosting around the edges. 🌸
Nutrition facts
Frequently asked questions
Why does this Amish peanut butter cake stay moist longer than others?
The secret lies in the combination of buttermilk and vegetable oil, which keep the cake tender. The 5-minute rest before baking also helps distribute moisture evenly. Unlike many recipes that use melted butter, this version relies on oil for a lighter texture that stays moist for days when stored properly.
Can I substitute powdered peanut butter for the natural kind?
Not recommended! Powdered peanut butter lacks the richness and moisture that natural peanut butter provides. It can make the cake taste artificial and may cause the frosting to separate. If you must use powdered, add 1 extra tablespoon of oil to compensate, but the texture won't be the same.
How do I fix a cake that's cracked on top?
Cracking usually happens from overbaking or opening the oven too soon. If you notice cracks, don't panic! Simply brush the top with simple syrup (equal parts sugar and water) while warm, then frost as usual. The frosting will help disguise the cracks. For next time, check for doneness at 25 minutes—the cake should spring back when gently pressed.
Is there a gluten-free version of this recipe?
Yes! Replace the all-purpose flour with a 1:1 gluten-free baking flour blend (like Bob's Red Mill) and add 0.5 teaspoon xanthan gum to improve texture. You may need to reduce the buttermilk by 1 tablespoon since gluten-free flours absorb more liquid. The frosting remains the same.
Can I make this cake in a bundt pan instead?
For a single-serving version, use a 10-cup bundt pan and reduce baking time to 35-40 minutes. The frosting will spread beautifully over the intricate design. Just be sure to grease the pan thoroughly and check for doneness 5 minutes early—bundt cakes can bake faster due to their shape.