
Desserts
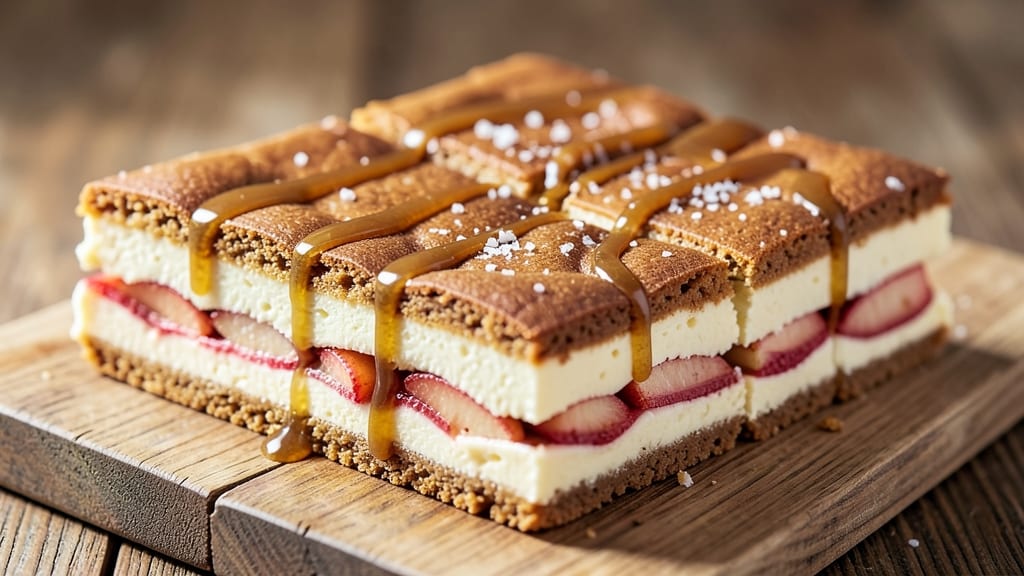
This apple blondie cheesecake bars recipe combines the best of two worlds—rich, creamy cheesecake and chewy blondie layers—all topped with caramelized apples for a dessert that feels like a hug. 💛 The secret lies in baking the layers separately before assembling, ensuring each component stays perfectly textured.
I developed this recipe after years of testing, balancing sweetness and texture to create a dessert that’s both impressive and foolproof.
The buttery blondie base provides structure, while the smooth cheesecake filling adds luscious creaminess between each layer. Caramelized apples on top bring a touch of warmth and natural sweetness that ties everything together. This recipe delivers restaurant-quality results without requiring advanced baking skills—just precise timing and attention to detail.
By the time you’re done, you’ll have a dessert that’s crisp at the edges, creamy in the middle, and topped with tender apples that caramelize beautifully.
The combination of textures and flavors makes these bars perfect for holidays, potlucks, or satisfying a sweet craving any day of the week. Ready to bake?
Whether you’re serving a crowd or treating yourself, these bars are designed to impress. The layers stay distinct, the apples stay gooey, and the cheesecake remains velvety—no soggy bottoms or crumbly tops here. Let’s get started on this showstopping dessert!
Ingredients for apple blondie cheesecake bars
Buttery blondie base meets velvety cheesecake with caramelized apples on top—this dessert delivers restaurant-quality layers without the fuss.
| Ingredient | Amount | Notes |
|---|---|---|
| All-Purpose Flour 🌾 | 2 cups | Sifted for even texture |
| Unsalted Butter 🧈 | 1 cup | Cold, cubed for blondie base |
| Granulated Sugar 🍚 | 1 ½ cups | Light brown preferred |
| Packed Light Brown Sugar 🍚 | ½ cup | For chewy texture |
| Large Eggs 🥚 | 2 whole | Room temperature |
| Vanilla Extract 🌿 | 1 tbsp | Pure, not imitation |
| Baking Powder 🧂 | 1 tsp | Aluminum-free preferred |
| Salt 🧂 | ½ tsp | Diamond Crystal kosher |
| Cream Cheese 🧀 | 8 oz | Full-fat, room temperature |
| Sour Cream 🥛 | ½ cup | Full-fat for creaminess |
| Powdered Sugar 🍚 | 1 cup | Sifted for smooth filling |
| Granny Smith Apples 🍎 | 2 medium | Peeled, cored, sliced thin |
| Unsalted Butter 🧈 | ¼ cup | Melted for caramelizing |
| Granulated Sugar 🍚 | ¼ cup | For apple topping |
| Cinnamon 🌿 | ½ tsp | Ground, not cassia |
The blondie base is where it all starts. King Arthur flour or Bob's Red Mill gives the best texture—don't skimp on quality here. For the butter, Plugrá or Land O'Lakes unsalted (the kind that comes in a tub) works perfectly. If you're using brown sugar, Domino or C&H are reliable brands, but the light brown kind makes all the difference for that perfect chew. The cream cheese? Philadelphia brand is the gold standard—room temperature is key, so take it out 30 minutes before baking. I always double-check my baking powder—Clabber Girl is my go-to, but make sure it's fresh.
No vanilla extract? Vanilla bean paste or even a scraped vanilla bean works in a pinch. For the apples, Granny Smiths are ideal—they hold their shape and caramelize beautifully, but Fuji or Honeycrisp will work too. If you can't find Diamond Crystal kosher salt, Morton or Redmond are fine substitutes. The caramelized apple topping? Don't rush it—slow cooking brings out the best flavor. And if you're worried about the bars being too sweet, reduce the powdered sugar to 3/4 cup—trust me, it's still delicious.
These bars keep beautifully—3 days at room temperature wrapped tightly, or 5 days in the fridge once sliced. For freezing, slice first, then wrap individually in plastic. They reheat perfectly in the oven at 300°F for 10 minutes—just enough to warm through without drying out. I always make a double batch because they disappear fast. Store the extra in an airtight container with parchment paper between layers to prevent sticking.
Why You'll Love This Recipe
- One-Bowl Magic: I swear by this recipe—just mix, bake, slice. No fancy layers, no fussing with crumb toppings. The butter and brown sugar blend into a dreamy blondie base while the apples keep it bright and fresh.
- Caramel-Kissed Crunch: That perfect balance of tender blondie and creamy cheesecake? It’s the brown sugar and butter playing nice with the apples. Honestly, the first bite makes me forget about store-bought desserts.
- Party in a Pan: Slice into neat bars for potlucks or pack them for lunch—no one will guess they’re so easy. I’ve taken them to book clubs, holiday gatherings, and even my kid’s soccer games. (Yes, even on a Tuesday night.)
- Budget Sweetness: Uses pantry staples—flour, sugar, butter—so it’s cheap but feels indulgent. Leftovers? They last days, and I’ve reheated them straight from the fridge without a hitch. My secret weapon for stress-free treats.
Step-by-step instructions for apple blondie cheesecake bars
Here's how to create the perfect hybrid dessert with crisp blondie edges and creamy cheesecake filling.
👨🍳 Step 1: Prepare the Blondie Base
Preheat your oven to 350°F and line a 9x13-inch baking pan with parchment paper, leaving an overhang on the sides for easy removal. In a large bowl, combine the 2 cups all-purpose flour, 1.5 cups granulated sugar, 0.5 cup packed light brown sugar, 1 tsp baking powder, and 0.5 tsp salt. Sift together for an even texture—this prevents dense spots in your bars.
Cut the 1 cup unsalted butter into ½-inch cubes and add to the dry ingredients. Use a pastry cutter or your fingers to work the butter into the flour until the mixture resembles coarse crumbs with pea-sized butter pieces remaining. This cold butter method creates flaky layers in your blondie base.
🍳 Step 2: Mix Wet Ingredients and Assemble Layers
In a separate bowl, whisk together the 2 whole large eggs, 1 tbsp vanilla extract, and 0.5 cup sour cream until smooth. Gradually pour the wet ingredients into the dry mixture, mixing just until combined—don't overmix or your bars will be tough. The dough should hold together when pressed but still be slightly crumbly.
Press half of the blondie dough evenly into the prepared baking pan, creating a thin, even layer. Bake for 12-15 minutes until the edges are lightly golden. This pre-bake prevents a soggy base when we add the filling later. Remove from the oven and let cool slightly while you prepare the cheesecake layer.
🥘 Step 3: Make the Cheesecake Filling
In a medium bowl, beat the 8 oz cream cheese and 1 cup powdered sugar together until completely smooth and creamy. Add the 0.5 cup sour cream and mix until fully incorporated. The mixture should be thick but spreadable—this is your cheesecake filling that will create that signature creamy layer.
Spread the cheesecake mixture evenly over the pre-baked blondie layer, leaving a ½-inch border around the edges. This border creates the classic blondie frame while keeping the cheesecake filling contained. Return to the oven and bake for another 12-15 minutes until the edges are set but the center still jiggles slightly.
🍎 Step 4: Prepare the Caramelized Apple Topping
While the cheesecake layer bakes, peel, core, and thinly slice the 2 medium Granny Smith apples. In a small saucepan, melt the 0.25 cup unsalted butter over medium heat. Add the 0.25 cup granulated sugar and 0.5 tsp cinnamon, stirring until the sugar dissolves completely. Add the apple slices and cook for 3-4 minutes until they begin to soften and release their juices.
Remove the partially baked bars from the oven and immediately arrange the caramelized apple slices in a single layer over the cheesecake filling, pressing down gently to create a neat pattern. The apples should cover the entire surface but leave the blondie border visible around the edges.
🔥 Step 5: Bake to Golden Perfection
Return the pan to the oven and bake for an additional 15-18 minutes until the apple topping is bubbly and the entire dessert has a golden hue. You'll know it's done when the edges are set and the center still has a slight wobble—this ensures the filling stays creamy. Let the bars cool completely in the pan for 1 hour before transferring to the refrigerator to set.
Once fully cooled, use the parchment overhang to lift the bars out of the pan. Cut into 16 equal bars using a sharp knife dipped in hot water between cuts for clean slices. Serve chilled—the contrast between the crisp blondie edges, creamy cheesecake layer, and caramelized apple topping makes these bars irresistible.
Pro Tips For Making Apple Blondie Cheesecake Bars
- Bake in Stages: I learned this the hard way—don’t bake the blondie layer all the way through first. Pull it when the edges are golden but the center still jiggles slightly (about 12-14 minutes at 350°F). The residual heat will finish cooking while you add the cheesecake layer, preventing a dry bottom.
- Press Apples Dry: Skip the soggy base by patting diced apples thoroughly with paper towels before folding them into the blondie batter. Wet apples release too much moisture, turning your bars into a dense, gummy mess. (Yes, even if you’re impatient like me.)
- Melt Butter Slowly: Use a double boiler or microwave in 20-second bursts to melt the butter for the blondie layer—never direct heat. Scorched butter ruins the whole flavor, and you’ll taste the burnt notes in every bite. This isn’t the prettiest method, but it’s the tastiest.
- Chill Before Slicing: Let the bars cool completely in the pan, then refrigerate for at least 2 hours before cutting. Warm bars crumble like sad cookies, and you’ll end up with uneven, messy slices. (Your future self will thank you.)
Serving suggestions for this dish
Presentation Perfection
Serve these bars on a marble slab or wooden board for an elegant touch—the contrast with the golden bars makes them look restaurant-worthy. I like to dust the cut edges with a pinch of cinnamon or a light sprinkle of powdered sugar right before serving to enhance the visual appeal.
For extra flair, add a few candied walnuts or toasted pecans on top of each bar. 💫
Portioning Tips
Cut the bars into 16 equal rectangles using a sharp chef's knife dipped in hot water between slices for clean, professional cuts. For a fun twist, use a cookie cutter to shape the bars into squares or even mini rectangles for appetizer-sized portions.
Wrap individual bars in parchment paper or clear cellophane for easy transport to parties or potlucks.
Garnish Game-Changers
A drizzle of warm caramel sauce or vanilla glaze elevates the presentation instantly. I also love adding a sprinkle of flaky sea salt on top to balance the sweetness.
For a seasonal touch, garnish with fresh apple slices or a cinnamon stick on the side. These small details make the dessert feel special without altering the flavors.
Serving Occasions
These bars are perfect for holiday gatherings, birthday celebrations, or even a cozy dessert night in. Their layered texture and rich flavors make them ideal for dessert buffets or as a centerpiece dessert at dinner parties.
For a casual setting, serve them with a scoop of vanilla ice cream or a dollop of whipped cream on the side. 🍽️
Make-Ahead Magic
Assemble the bars completely (including the apple topping) and refrigerate for up to 24 hours before baking. This is a lifesaver for busy days! Once baked, store them in an airtight container with parchment paper between layers to keep them fresh.
Reheat individual bars in the microwave for 10-15 seconds to restore their gooey apple topping if needed.
Pairing Perfection
Serve with a bold red wine like Cabernet Sauvignon or a smooth dessert wine such as Moscato to complement the caramelized apples and cheesecake layers. For non-alcoholic options, a chilled chai latte or espresso pairs beautifully.
The warm spices in the drink enhance the cinnamon notes in the bars, creating a harmonious flavor experience. ☕
Nutrition facts
Frequently asked questions
Can I make these bars without a 9x13-inch pan?
Yes! You can use an 8x8-inch pan for smaller bars or a 10x15-inch jelly roll pan for longer, thinner slices. Adjust baking times by 2-3 minutes per layer—smaller pans may need slightly less time. For even distribution, press the blondie dough 1/4-inch thick in any pan size. The key is maintaining the same layer proportions for texture balance.
Why did my cheesecake layer turn rubbery?
Rubbery cheesecake usually means overbaking or undercooked apples. Bake the cheesecake layer until edges are set but the center still jiggles slightly—it should firm up as it cools. For the apples, cook them just until tender (about 3-4 minutes), not mushy. If using tart apples like Granny Smith, reduce sugar in the caramel topping to 1/4 cup to prevent excess moisture.
Can I substitute apples in this recipe?
For a sweeter twist, try Honeycrisp or Fuji apples. For a spiced flavor, use pear slices with 1/2 tsp cardamom instead of cinnamon. If you prefer no fruit, replace the topping with a streusel layer (mix 1/2 cup flour, 1/4 cup brown sugar, 1/4 cup cold butter)—just bake it for 5-7 minutes at the end.
How do I prevent soggy blondie layers?
Pre-baking the blondie base for 12-15 minutes is critical—it creates a sturdy barrier. Let each layer cool 5-10 minutes between steps to prevent steam from making the bottom soggy. Chill the assembled bars in the fridge for 1 hour before baking the final layer. Also, avoid overmixing the blondie dough—just combine until crumbly for best texture.
Can I make these bars gluten-free?
Yes, but with adjustments. Replace the all-purpose flour with a 1:1 gluten-free baking flour blend (like Bob's Red Mill) and add 1 tsp xanthan gum to improve structure. For the blondie base, reduce the butter by 1 tbsp to compensate for the blend's moisture. The cheesecake layer will still be creamy, but the blondie texture may be slightly denser. Test with 1/2 the recipe** first.