
Desserts
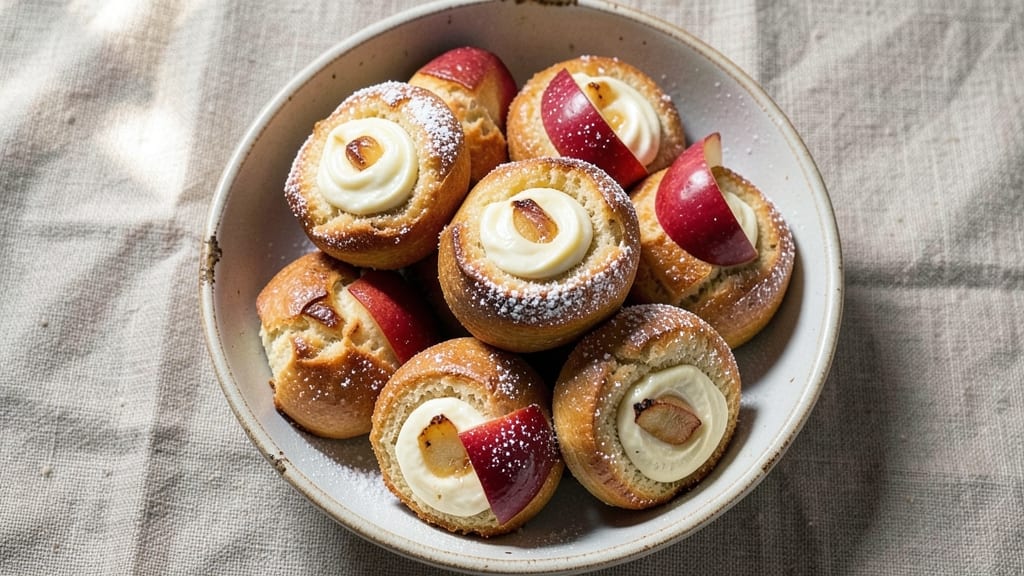
This apple cheesecake buns recipe delivers the perfect balance of buttery, flaky pastry wrapped around creamy cheesecake and spiced apple filling—each bite offers a symphony of textures and flavors.
The secret lies in infusing the dough with apple puree for subtle sweetness while keeping the crust crisp, and swirling the cheesecake filling with caramelized apples for that signature restaurant-quality twist.
I developed this recipe after years of perfecting the art of layered buns, ensuring the cheesecake stays rich and tangy while the apples add just enough warmth to complement every forkful.
The process begins with a simple yet foolproof yeast dough that incorporates apple puree for natural sweetness without overpowering the cheesecake filling. While the dough rests, you'll prepare the cheesecake mixture—a velvety blend of cream cheese, sugar, and vanilla—and fold in caramelized apples for bursts of flavor in every bite.
The assembly is where the magic happens: rolling out the dough, spreading the filling, and twisting it into elegant buns that rise to golden perfection in the oven.
What you'll end up with are buns that are crisp on the outside, tender within, and packed with layers of creamy cheesecake and spiced apple filling. The contrast between the buttery crust, tangy cheesecake, and sweet apples creates a harmony that's impossible to resist.
These buns are perfect for breakfast, brunch, or even dessert—each one is a little taste of indulgence that feels like a hug in edible form.
Make-ahead tips ensure you can prepare these buns in advance without sacrificing freshness. Pre-bake the buns and store them at room temperature, or chill the assembled buns before baking for a slower rise and even better flavor development.
Whether you're serving them warm with a dusting of powdered sugar or glazed for extra shine, these apple cheesecake buns are sure to become a favorite in your household.
Ingredients for apple cheesecake buns
Twelve ingredients create these buttery, cheesy apple buns with perfect swirls inside.
| Ingredient | Amount | Notes |
|---|---|---|
| All-Purpose Flour 🌾 | 4 cups | Plus 2 tbsp for dusting |
| Granulated Sugar 🍚 | ¼ cup | For dough sweetness |
| Active Dry Yeast 🍞 | 2 ¼ tsp | Or 1 packet instant yeast |
| Unsalted Butter 🧈 | ½ cup | Cold, cubed for dough |
| Warm Whole Milk 🥛 | ¾ cup | 110°F for yeast activation |
| Large Eggs 🥚 | 1 whole | Room temperature |
| Apple Puree 🍎 | ½ cup | Unsweetened, from 2 apples |
| Salt 🧂 | 1 tsp | Diamond Crystal preferred |
| Cream Cheese 🧀 | 8 oz | Full-fat, room temperature |
| Powdered Sugar 🍚 | ¾ cup | For cheesecake filling |
| Vanilla Extract 🌸 | 1 tsp | Pure vanilla preferred |
| Apples 🍎 | 2 medium | Peeled, diced for filling |
| Ground Cinnamon 🌿 | 1 ½ tsp | For apple filling |
| Lemon Juice 🍋 | 1 tbsp | Freshly squeezed |
| Powdered Sugar 🍚 | ¼ cup | For glazing (optional) |
The apples are non-negotiable—Honeycrisp or Fuji make the best puree and filling. For the dough, King Arthur flour gives the best rise, but any all-purpose works. The cream cheese? Philadelphia is my go-to—it melts smoothly. If you're using pre-made apple puree, check the label—some brands add sugar. For the freshest flavor, I always make my own by blending peeled, cored apples with a splash of water and straining. Trader Joe's sells pre-peeled apples if you're short on time.
No apple puree? Substitute with 0.5 cup unsweetened applesauce—just know it'll be slightly thinner. Running low on vanilla? Almond extract at half the amount works in a pinch, but the flavor's different. The cinnamon in the filling can be swapped for pumpkin pie spice at the same quantity. For a tangier cheesecake, add 0.5 tsp lemon zest to the filling. And if you're making these ahead, freeze the assembled buns before baking—they'll rise beautifully straight from frozen.
The dough keeps for 2 days wrapped in plastic, but the filling should be made fresh. Once baked, these reheat best at 350°F for 10 minutes—they're even better the second day. For make-ahead buns, glaze them first before storing at room temperature. The filling stays creamy for 3 days in the fridge, so make extra if you're feeding a crowd. I always bake an extra batch—they disappear fast!
Why You'll Love This Recipe
- No Yeast Fuss: I mix the dough with just flour, milk, and butter—no kneading, no waiting for the yeast to wake up. Honestly, the buns turn out fluffy anyway, and the apple-cheesecake filling makes up for any "imperfection."
- Sweet-Creamy Magic: That creamy cheesecake swirl with spiced apples? It’s the kind of flavor combo that makes you pause mid-bite. Between us, the warm milk in the dough gives them a tender chew that pairs perfectly with the tangy-sweet filling.
- Breakfast or Dessert: Serve them warm with butter for a weekend brunch, or dust with powdered sugar for a no-guilt treat. I’ve even packed them for lunch—still delicious cold, but honestly? They disappear faster when they’re fresh out of the oven.
- Budget-Friendly Baking: Five basic pantry staples, and you’ve got a crowd-pleaser. The dough uses just a stick of butter and a splash of milk, and the filling stretches far enough that I can freeze half for another week. Minimal cost, maximum satisfaction.
Step-by-step instructions for apple cheesecake buns
Here's how to create flaky, golden buns with rich apple cheese swirls that'll impress everyone.
Activate the Yeast for Perfect Rise
In a small bowl, combine the 0.75 cup warm whole milk (about 110°F) with the 0.25 cup granulated sugar and 2.25 teaspoons active dry yeast. Let it sit for 5-10 minutes until it becomes frothy and bubbly. This step is crucial—if it doesn't bubble, your yeast is dead and the dough won't rise properly.
While waiting, whisk together the 1 whole large egg and 1 teaspoon salt in a separate bowl. The egg adds structure while the salt enhances flavor and controls yeast activity. Keep both mixtures at room temperature for best results.
Mix and Knead the Dough
In a large mixing bowl, combine the 4 cups all-purpose flour and set aside. Gradually add the yeast mixture, egg mixture, and 0.5 cup cold unsalted butter (cut into small cubes) to the flour. Mix with a wooden spoon until a shaggy dough forms.
Turn the dough onto a lightly floured surface and knead for 8-10 minutes until smooth and elastic. You'll know it's ready when it springs back slowly when poked. If the dough feels too sticky, add 1 tablespoon flour at a time—but don't overdo it or the buns will be dense. Shape into a ball, lightly oil the bowl, and let rise in a warm place for 1 hour or until doubled in size.
Prepare the Apple Cheese Filling
While the dough rises, make the filling by mixing the 8 ounces cream cheese (softened), 0.75 cup powdered sugar, and 1 teaspoon vanilla extract until smooth. In a separate bowl, combine the 0.5 cup apple puree, 1.5 teaspoons ground cinnamon, and 1 tablespoon lemon juice. Fold this into the cream cheese mixture until well blended.
Peel and dice the 2 medium apples (I like Honeycrisp or Granny Smith) and stir them into the filling. The apples will soften during baking, creating pockets of spiced apple goodness. Cover and refrigerate while you shape the buns.
Shape and Swirl the Buns
Punch down the risen dough and divide it into 12 equal pieces (about 3 ounces each). Roll each piece into a 12-inch rope. Take one rope, place 1 teaspoon of apple cheese filling near one end, then roll up tightly to seal. Repeat with remaining dough and filling.
Arrange the buns in a greased 9x13-inch baking pan, leaving 1 inch between them. Cover with a clean kitchen towel and let rise for 30-45 minutes until puffy. Preheat your oven to 375°F while they rise—this ensures they go straight into a hot oven for even baking.
Bake to Golden Perfection
Bake the buns for 20-25 minutes until they're deep golden brown and smell heavenly. If the tops brown too quickly, loosely cover with foil. The internal temperature should reach 190°F when checked with an instant-read thermometer.
For extra shine, brush the warm buns with 2 tablespoons milk mixed with 0.25 cup powdered sugar (optional glaze). Let cool for 10 minutes before serving—this prevents filling from oozing out. Each bite delivers flaky layers, creamy cheese, and spiced apple in perfect harmony.
Pro Tips For Making Apple Cheesecake Buns
- Proof the Yeast Right: Mix your yeast with warm milk (105–110°F) and a pinch of sugar first—wait 5–10 minutes until it foams before adding dry ingredients. I learned this the hard way when my dough took forever to rise because the yeast was still asleep.
- Cut Butter Cold: Use unsalted butter straight from the fridge—don’t soften it first. Cold butter creates flaky layers in the dough, and you’ll thank yourself when those buns have that perfect melt-in-your-mouth texture.
- Skip Over-Kneading: Once the dough comes together, knead just until smooth—about 3–4 minutes by hand. Overworking it makes the buns tough, and nobody wants a chewy apple cheesecake bun.
- Preheat Pan Properly: Before baking, place your muffin tin in a 375°F oven for 5 minutes with a tablespoon of butter or oil in each cup. This ensures even browning and prevents soggy bottoms—trust me, it’s worth the extra minute.
Make-ahead tips for this recipe
Pre-Bake Storage
Shape your buns as directed, but instead of baking immediately, place them in an airtight container lined with parchment paper. Store at room temperature for up to 24 hours—this gives flavors time to meld beautifully.
I like to refrigerate them overnight for an even richer taste. When ready to bake, simply preheat your oven and bake as usual. 💫
Filling Prep Ahead
Prepare the apple cheese filling up to 2 days in advance and store it in an airtight container in the fridge. The cream cheese stays perfectly smooth, and the apples soften just enough to integrate flawlessly.
When ready to use, let it sit at room temperature for 15-20 minutes before rolling into the dough. This prevents the filling from being too cold and keeps the buns tender. ✨
Assembled Buns
For a make-ahead breakfast, shape and arrange your buns in the pan, then refrigerate them overnight (up to 12 hours). This slower rise creates a more complex flavor and a lighter texture.
When you're ready to bake, simply preheat your oven and bake as directed—no extra time needed! I often do this when hosting brunch—it’s a game-changer for busy mornings. 🌟
Freezing Fully Baked
Bake your buns as usual, then let them cool completely. Place them in a single layer on a baking sheet, freeze for 1 hour, then transfer to a freezer-safe bag or airtight container.
They’ll keep for up to 3 months. To reheat, thaw overnight in the fridge and warm at 350°F for 10-12 minutes until heated through. The texture stays perfect—no soggy surprises! ❄️
Glaze for Later
Make your powdered sugar glaze ahead of time and store it in a small jar at room temperature. When you’re ready to serve, simply brush it over the warm buns. This keeps your workspace clean and saves time on busy days.
For extra shine, add 1 teaspoon milk to the glaze right before applying. It dries to a gorgeous, glossy finish. 💛
Portion Control
Divide the dough and filling into individual portions (12 buns) and wrap each in plastic wrap. Store in a freezer bag for up to 1 month. When ready to bake, let them thaw in the fridge overnight, then proceed with the recipe.
This is perfect for meal prep—just grab and bake whenever you’re craving something sweet! 🍎
Nutrition facts
Frequently asked questions
Can I make these buns without yeast?
Yes! For a quick version, replace the yeast dough with 1 box (18.25 oz) refrigerated biscuit dough like Pillsbury. Roll each piece into a 12-inch rope, add 1 teaspoon filling, and roll up as directed. Bake at 375°F for 15-18 minutes—they'll be ready faster with a slightly denser texture. The apple cheese filling still shines through beautifully!
How do I prevent the filling from leaking out?
Seal the filling tightly when rolling by pinching the dough edges firmly around the filling. For extra security, chill the assembled buns for 30 minutes before baking—this firms up the dough. If you notice filling oozing during baking, the oven may be too hot. Reduce to 350°F and cover loosely with foil.
What's the best way to reheat leftover buns?
Warm at 350°F for 8-10 minutes wrapped in foil to keep them moist. For a crispy exterior, uncover for the last 2 minutes. Microwave reheating works too: 20-30 seconds on high, but they'll be softer. Always reheat from room temperature for even results.
Can I substitute other fruits in the filling?
Try peach puree (swap 1:1 with apple) or blueberries (fold in after baking). For a citrus twist, use orange zest instead of cinnamon. Just adjust sweetness—tart fruits like lemon need more sugar. The cheesecake base remains the star, so keep that ratio consistent.
Why did my buns turn out dense?
Dense buns usually mean over-kneading, expired yeast, or cold ingredients. Check your yeast first—it should bubble within 5-10 minutes in warm milk. Keep butter cold when mixing, and don't over-handle the dough. If using a mixer, knead only until smooth (5-6 minutes on low). Let dough rise in a warm spot (80°F) for best results.