
Desserts
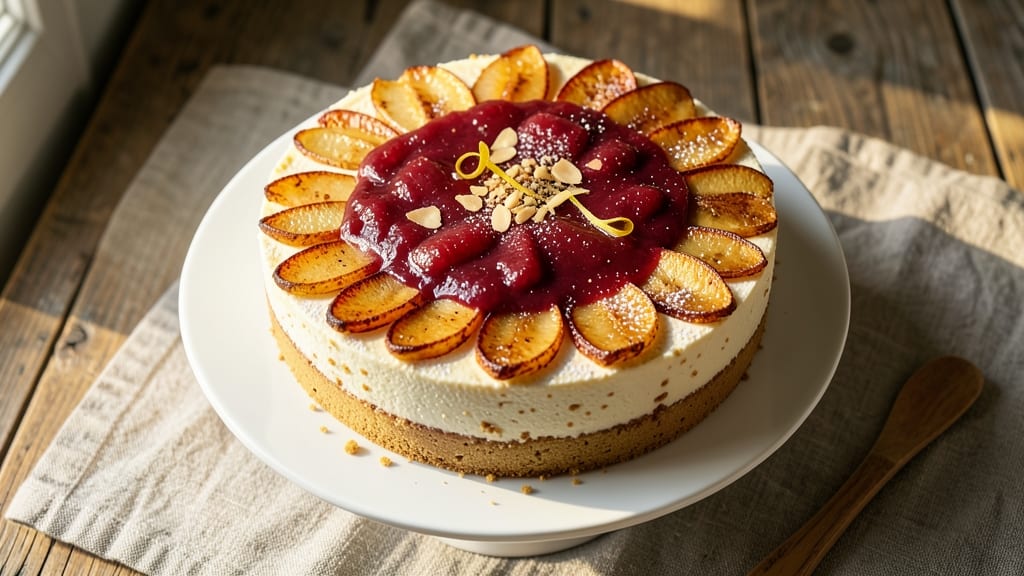
This apple mousse cake recipe delivers the perfect balance of fluffy layers and silky apple filling—every bite is a harmonious blend of tender cake and velvety mousse.
The secret lies in a light-as-air sponge cake base that holds up to the creamy apple filling, topped with a smooth vanilla frosting that ties everything together.
I've perfected this recipe to ensure the mousse stays perfectly set while the cake remains moist, creating a dessert that's both elegant and foolproof.
The process begins with baking a delicate cake that's sturdy enough to support the filling but still tender enough to melt in your mouth. While the cake cools, you'll prepare the apple mousse using a combination of fresh apples, gelatin, and whipped cream for that signature light texture.
The key is letting the gelatin bloom properly and folding the whipped cream just until combined—overmixing will deflate the mousse, and we're aiming for cloud-like perfection.
Assembling the layers is where the magic happens. Each slice of cake becomes a vessel for the apple mousse, creating a dessert that's as beautiful as it is delicious. The vanilla frosting adds a final touch of sophistication, while the chilling time ensures everything sets properly.
This cake isn't just a dessert—it's a showstopper that will impress even the most discerning guests.
Whether you're celebrating a special occasion or simply craving a decadent treat, this apple mousse cake delivers restaurant-quality results with minimal fuss. The recipe scales easily for gatherings, and the techniques are simple enough for home bakers to master.
Let's get started on creating a dessert that's as delightful to make as it is to eat.
Ingredients for apple mousse cake
Fluffy cake layers, velvety apple mousse, and silky vanilla frosting—just 14 ingredients for restaurant-quality dessert.
| Ingredient | Amount | Notes |
|---|---|---|
| All-Purpose Flour 🌾 | 2 ½ cups | Sifted for light texture |
| Granulated Sugar 🍚 | 2 cups | Superfine preferred for smoothness |
| Unsalted Butter 🧈 | 1 cup | Cold, cubed for cake |
| Large Eggs 🥚 | 4 whole | Room temperature |
| Baking Powder 🧂 | 2 tsp | Metal container preferred |
| Salt 🧂 | ½ tsp | Fine sea salt |
| Vanilla Extract 🍯 | 1 tbsp | Pure alcohol-free preferred |
| Red Delicious Apples 🍎 | 4 medium | Peeled, cored, diced |
| Granulated Sugar 🍚 | ½ cup | For apple filling |
| Unsweetened Applesauce 🍎 | ½ cup | Unsweetened for balance |
| Powdered Sugar 🍚 | 1 cup | For frosting |
| Heavy Whipping Cream 🥛 | 1 cup | Cold for whipping |
| Unflavored Gelatin 🍬 | 1 ½ tsp | Bloomed in cold water |
| Vanilla Bean Paste 🍯 | 1 tsp | For intense flavor |
The apples are everything here. Red Delicious holds its shape when baked, but Granny Smith adds tartness if you prefer. Whole Foods or your local market usually carry the best quality—avoid mealy spots. Peel and dice them right before mixing to prevent browning. For the cake, Bob's Red Mill flour works best, but any all-purpose will do. The butter needs to be cold for a tender crumb, so pull it straight from the fridge. If your kitchen gets warm, chill the dough for 30 minutes before baking.
No vanilla bean paste? Pure vanilla extract at double the amount works in a pinch. The gelatin must be bloomed properly—sprinkle it over cold water and let sit for 10 minutes before heating. For the frosting, powdered sugar from a canister prevents clumping, but sift if you're using a box. Short on applesauce? Unsweetened applesauce from a jar is fine, but homemade has more flavor. The whipping cream should be very cold—chill the bowl and beaters for 15 minutes before whipping. Overmixing will make the mousse dense, so fold just until combined.
Store cake layers wrapped in plastic at room temperature for 2 days, or freeze for 3 months. The mousse filling keeps for 5 days in the fridge, but assemble the cake day-of for best texture. If making ahead, bake the cake and prepare the mousse separately, then assemble before serving. The frosting can be made 1 day ahead—just re-whip before using. For a crowd, double the recipe and use two 9-inch pans for the cake layers.
Why You'll Love This Recipe
- No Mixer Needed: I swear by this—just a bowl and a whisk. The butter and sugar get creamed by hand in minutes, and the eggs fold right in without a trace of struggle. My hands get tired, but my patience pays off with that perfect, airy crumb.
- Apple Butter Magic: That first bite? The tender cake soaks up the mousse like a dream, but it’s the spiced apples (yes, I caramelize them in the oven) that steal the show. Sweet, tangy, and just enough warmth—no one ever skips seconds.
- Weeknight to Party: Same batter, same mousse—just different occasions. Serve it plain for a quick breakfast, or layer it with whipped cream and a sprinkle of cinnamon for a showstopper dessert. Honestly, I’ve used it for book club, potlucks, and even a lazy Sunday brunch.
- Budget-Friendly Luxury: Five ingredients, zero shortcuts. The butter and eggs make it feel fancy, but the flour and sugar stretch further than you’d think. Leftovers? They’re even better the second day—if they last that long. (Between us, they rarely do.)
Step-by-step instructions for apple mousse cake
Here's how to create layers of tender cake, rich apple filling, and silky vanilla mousse.
Bake the Cake Layers
Preheat your oven to 350°F. Grease two 8-inch round cake pans and line the bottoms with parchment paper. In a large bowl, combine the 2.5 cups all-purpose flour, 2 cups granulated sugar, 2 tsp baking powder, and 0.5 tsp salt. Sift the dry ingredients together to remove any lumps and ensure even distribution.
Cut the 1 cup unsalted butter into ½-inch cubes and let it sit at room temperature for 10 minutes to soften slightly. Add the butter to the dry ingredients and use a pastry cutter or your fingers to work it into the flour until the mixture resembles coarse crumbs with pea-sized butter pieces remaining. This cold butter method creates a tender cake texture.
Add the 4 whole large eggs, one at a time, beating just until each is incorporated. Mix in the 1 tbsp vanilla extract until combined. Divide the batter evenly between the prepared pans. Bake for 25-30 minutes or until a toothpick inserted into the center comes out clean. Let the cakes cool in the pans for 10 minutes, then transfer to a wire rack to cool completely.
Prepare the Apple Filling
Peel, core, and dice the 4 medium red delicious apples into ¼-inch pieces. In a medium saucepan, combine the diced apples with the 0.5 cup granulated sugar and 0.5 cup unsweetened applesauce. Cook over medium heat for 10-12 minutes, stirring occasionally, until the apples are tender and the mixture has thickened slightly. You want the filling to be soft but not mushy—it should hold its shape when spooned.
Remove the pan from heat and let the apple mixture cool completely. Once cooled, transfer it to a food processor or blender and purée until smooth. The filling should be thick enough to hold its shape when piped but still spreadable. If it's too thick, add 1 teaspoon water at a time until you reach the desired consistency. This filling will be sandwiched between the cake layers and mousse.
Make the Vanilla Mousse
In a small bowl, sprinkle the 1.5 tsp unflavored gelatin over 3 tablespoons cold water and let it bloom for 5 minutes. Meanwhile, in a heatproof bowl set over a pot of simmering water (double boiler), whisk together ½ cup heavy whipping cream and 1 tsp vanilla bean paste. Heat gently, stirring constantly, until the cream is warm but not hot to the touch.
Remove the bowl from the heat and whisk in the bloomed gelatin until fully dissolved. Let the mixture cool to room temperature, then transfer it to the refrigerator to chill for 15 minutes. In a separate large bowl, whip the remaining ½ cup heavy whipping cream and 1 cup powdered sugar to stiff peaks. Gently fold the chilled gelatin mixture into the whipped cream until fully combined, being careful not to deflate the whipped cream. The mousse should be light and airy with a smooth, velvety texture.
Assemble the Cake
Once the cake layers are completely cool, level the tops if necessary and trim any domed edges. Place one cake layer on a serving plate or cake stand. Spread an even layer of the apple filling over the top, leaving a ½-inch border around the edges. This will prevent the filling from oozing out during serving.
Spread the vanilla mousse evenly over the apple filling, creating a smooth, level surface. Place the second cake layer on top and press gently to adhere. Chill the assembled cake in the refrigerator for at least 4 hours, or preferably overnight, to allow the flavors to meld and the mousse to set completely. This chilling step is crucial for achieving the perfect light-as-air texture promised in the title.
Serve and Enjoy
Remove the cake from the refrigerator and let it sit at room temperature for 10-15 minutes before slicing. This brief resting period helps the layers hold together better when cut. Use a sharp serrated knife to slice through the cake, wiping the blade clean between cuts to ensure neat, clean slices.
Serve the apple mousse cake immediately after slicing. Each slice should reveal layers of tender cake, vibrant apple filling, and fluffy vanilla mousse. The contrast between the dense cake layers and the light, airy mousse creates a delightful textural experience with every bite. The applesauce in the filling adds subtle moisture, balancing the richness of the mousse and cake.
Pro Tips For Making Apple Mousse Cake
- Cream Butter First: DESCRIPTION: Don’t just toss cold butter into the flour—rub it into the dry ingredients with your fingertips until it looks like coarse crumbs. I used to just cut it in quickly, but this step guarantees a lighter, flakier cake base. (Yes, it takes 30 seconds longer, but your mousse layer won’t sink like a lead balloon.)
- Whisk Eggs Separately: DESCRIPTION: Beat the eggs alone first until they’re thick and pale, then fold them into the batter last. I learned this after a batch turned dense—turns out, overmixing the batter with whole eggs kills air bubbles. Save the yolks for the mousse layer if you’re making it from scratch.
- Skip the Overmixing: DESCRIPTION: As soon as the flour disappears, stop stirring. I’ve ruined three cakes by turning the dough into glue, and the mousse layer suffers when the cake’s too tough. Two minutes max—just until it comes together. (Your future self will thank you.)
- Chill the Batter: DESCRIPTION: Let the cake batter sit for 10 minutes before baking—no excuses. Cold butter melts slower, so the cake rises evenly instead of doming or cracking. I was skeptical until I tried it, and now I never skip it. (Pro tip: Use this time to prep your apples for the mousse.)
Make-ahead tips for this dish
Cake Layer Prep
Bake your cake layers 1 day ahead—they keep beautifully wrapped in plastic at room temperature. This gives you flexibility to assemble the cake when you're ready.
If storing longer than 2 days, freeze the layers wrapped tightly in plastic wrap and aluminum foil for up to 3 months. Thaw completely before assembling. 💫
Mousse Timing
The vanilla mousse is the most time-sensitive component. Prepare it at least 4 hours before assembling the cake to ensure proper setting. If you're short on time, make the mousse 1 day ahead and store it in an airtight container in the fridge.
Give it a quick whisk before using to restore its airiness.
Filling Flexibility
The apple filling can be made 2 days ahead and stored in the refrigerator. It thickens as it cools, so add 1 teaspoon water when reheating to restore its spreadable consistency. For a smoother texture, strain the cooled filling through a fine-mesh sieve before using between cake layers.
Assembly Strategy
Assemble the cake 12-24 hours before serving for the best texture. The longer it chills, the more the flavors meld together. If you must serve it sooner, chill for at least 4 hours and let it sit at room temperature for 15 minutes before slicing to prevent crumbling.
Use a serrated knife and wipe it clean between slices for perfect presentation.
Freezer-Friendly Tips
For a make-ahead party dessert, assemble the entire cake (including frosting if using) and freeze it on a tray for 1 hour before wrapping tightly in plastic and foil. Thaw in the fridge overnight.
The cold temperatures help the mousse maintain its structure during freezing. Just let it sit at room temperature for 20 minutes before serving for perfect slices.
Portion Control
If serving a crowd, divide the assembled cake into individual portions and wrap each slice tightly in plastic wrap. Store these in the fridge for up to 3 days or freeze for 2 weeks.
Reheat individual portions in the microwave for 10-15 seconds to restore the mousse's creamy texture before serving. This makes it perfect for potlucks or office parties! 🍎
Nutrition facts
Frequently asked questions
Can I substitute regular gelatin with agar-agar for a vegan version?
Yes! For a vegan apple mousse, replace the 1.5 tsp gelatin with 1.5 tsp agar-agar powder. Bloom it in 3 tbsp cold water for 5 minutes, then heat with the cream until fully dissolved. Agar-agar sets firmer than gelatin, so reduce the whipping cream by 2 tbsp to maintain lightness. Chill the mousse for 2 extra hours before assembling.
Why did my mousse turn grainy instead of silky?
Graininess usually means the gelatin wasn't fully dissolved or the cream was overmixed. Always bloom gelatin in cold water first, then heat gently with cream until completely clear. For the whipped cream portion, fold in the gelatin mixture just until combined—overmixing breaks down the fat molecules. If it's already grainy, blend briefly with 1 tbsp powdered sugar to smooth it out.
How do I prevent the cake layers from drying out?
Store baked cake layers in an airtight container with a slice of apple or lemon on top to retain moisture. For extra protection, brush the cooled layers lightly with simple syrup (1 tbsp sugar + 1 tbsp water, heated and cooled). Assemble the cake within 2 days for best texture—longer storage causes the layers to absorb moisture from the filling.
Can I make this cake without an oven?
For a no-bake version, replace the cake layers with store-bought pound cake or sponge cake (about 16 oz total). Cut into two 8-inch rounds and level the tops. Proceed with the apple filling and mousse assembly as directed. Chill for 6 hours before serving since there's no baked structure to hold the layers together.
What's the best way to decorate this cake?
For a rustic look, dust the chilled cake with powdered sugar through a fine-mesh sieve. For elegance, pipe swirls of vanilla buttercream along the sides using a star tip. Add fresh apple slices or candied apple chips as garnish. For a modern touch, create a mirror glaze by mixing ½ cup powdered sugar + 1 tbsp lemon juice + 1 tsp corn syrup, then drizzle over the top.