
Desserts
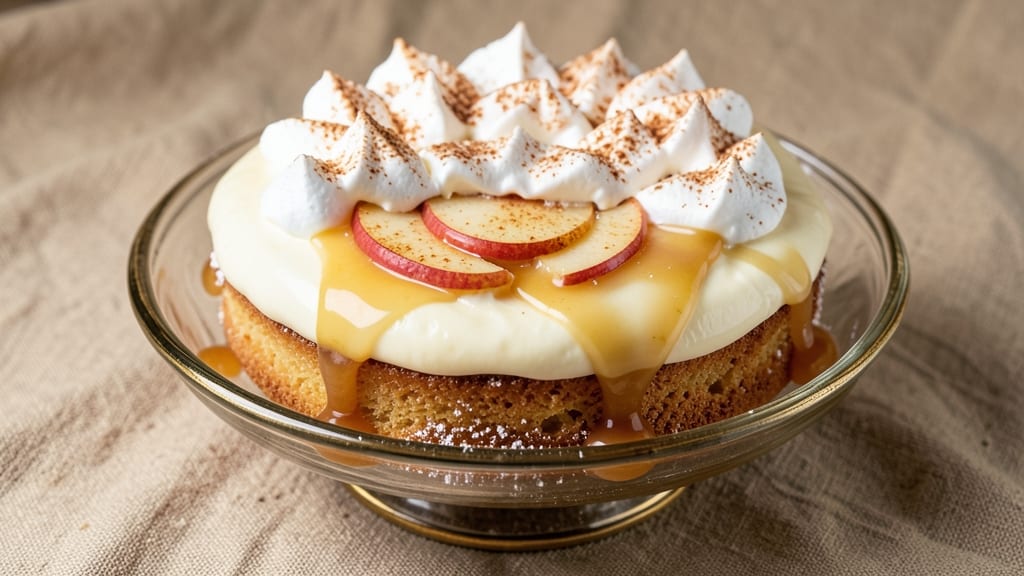
This apple spoon cake recipe delivers bite-sized desserts with a perfect balance of tender cake and spiced apple filling—ideal for tea parties or holiday gatherings. The secret lies in steaming the apple mixture to create a silky center that contrasts beautifully with the cake's delicate texture.
I've refined this technique over years to ensure each spoonful delivers that comforting, apple-spiced warmth.
The recipe begins with a simple cake batter that comes together in minutes, while the apple filling requires just a few ingredients: apples, sugar, cinnamon, and a touch of lemon juice.
The key is cooking the apples until they're tender but still hold their shape, ensuring they stay intact when baked inside each cake. This method guarantees a clean, elegant centerpiece that's as visually appealing as it is delicious.
What you'll achieve is a batch of golden, mini cakes with a soft exterior and a luscious apple center that melts in your mouth. The spices—cinnamon and nutmeg—add warmth without overpowering, while the lemon juice brightens the filling.
These cakes are perfect for serving at room temperature, making them ideal for potlucks or last-minute dessert needs.
For an extra touch, dust with powdered sugar or serve with a dollop of whipped cream. The recipe scales easily, so you can make just a few for a small gathering or double the batch for a crowd.
Here's how to create these charming, comforting treats that taste like a hug in every bite.
Ingredients for apple spoon cake
Twelve simple ingredients create these elegant mini cakes with spiced apple centers.
| Ingredient | Amount | Notes |
|---|---|---|
| All-Purpose Flour 🌾 | 1 ½ cups | Sifted for light texture |
| Granulated Sugar 🍚 | 1 cup | White or light brown |
| Unsalted Butter 🧈 | ½ cup | Cold, cubed for best results |
| Large Eggs 🥚 | 2 whole | Room temperature preferred |
| Baking Powder 🧂 | 1 ½ tsp | Aluminum-free preferred |
| Ground Cinnamon 🌿 | 1 ½ tsp | Freshly ground if possible |
| Ground Nutmeg 🌿 | ½ tsp | Freshly grated preferred |
| Salt 🧂 | ½ tsp | Fine sea salt preferred |
| Granny Smith Apples 🍎 | 3 medium | Peeled, cored, diced small |
| Light Brown Sugar 🍚 | ¼ cup | Packed firmly |
| Lemon Juice 🍋 | 1 tbsp | Freshly squeezed |
| Vanilla Extract 🌸 | ½ tsp | Pure vanilla preferred |
| Milk 🥛 | ¼ cup | Whole milk for richness |
| Powdered Sugar 🍚 | ¼ cup | For dusting finished cakes |
The apples are the heart of this recipe—Granny Smith for tartness, but any crisp variety works. Walmart or local markets usually have them at their peak in fall, but year-round stores like Trader Joe's carry them too. Look for firm apples with no bruises. The trick is dicing them small so they steam perfectly inside the cakes. I always peel them first—their vibrant color shows through the cake batter, making these look extra special for gatherings.
No Granny Smith? Honeycrisp or Fuji are great swaps—they're sweeter but still hold up well. Running short on milk? Heavy cream or almond milk both work, though the texture will differ slightly. The vanilla extract matters here—imitation vanilla won't give that warm depth. For the spices, if you've got whole nutmeg, grate it fresh—it's worth the extra minute. And that powdered sugar? Confectioners' sugar from the store is fine, but I always make my own by blending granulated sugar with a pinch of cornstarch for better sifting.
These cakes keep beautifully at room temperature for 3 days in an airtight container, though they're best enjoyed fresh. For longer storage, freeze them for up to 3 months—just thaw at room temperature before serving. I like to wrap them individually in parchment paper before freezing so they don't stick together. The apple filling actually tastes better the next day as the flavors meld. Serve with a dollop of whipped cream or a sprinkle of toasted pecans for extra elegance.
Why You'll Love This Recipe
- No Mixer Needed: I swear by this recipe when my hands are full—just fold the dry ingredients into the butter and apples with a wooden spoon. The texture comes out tender but sturdy, like a hug from your grandma, but with zero cleanup.
- Butter-Sugar Magic: That melted butter folded into the batter? It’s what makes these cakes rich without tasting heavy. The sugar caramelizes just enough to give each bite a subtle sweetness that pairs perfectly with the apples’ natural tartness.
- Picnic or Pudding: Between us, these are my go-to for lunchboxes or dessert after a long day. Slice them warm with a sprinkle of cinnamon, or pack them cold—they hold up either way. Honestly, I’ve even reheated leftovers in the toaster and called it breakfast.
- Pantry Staple Power: All the ingredients are things I already have on hand—no specialty items, no last-minute grocery runs. The batter keeps for days in the fridge, and the cakes freeze beautifully. My wallet and my schedule both thank me for this one.
Step-by-step instructions for apple spoon cake
Here's how to create these charming mini cakes with a spiced apple surprise at their heart.
👨🍳 Step 1: Prepare the Apple Filling
Peel, core, and dice the 3 medium Granny Smith apples into small, even pieces—about ¼-inch cubes. Toss them in a bowl with the 1 tablespoon lemon juice to prevent browning while you work. In a separate small saucepan, combine the diced apples, 0.25 cup light brown sugar, 0.5 teaspoon vanilla extract, and 0.25 cup milk. Cook over medium heat for 5-6 minutes, stirring occasionally, until the apples soften but still hold their shape.
Here's the thing—you want the filling to be thick enough to stay contained in the center of each cake when baked. If it's too runny, the apples will leak out. Taste and adjust sweetness if needed, then let the mixture cool completely before using. This step ensures your centerpiece stays intact and delicious.
👨🍳 Step 2: Make the Cake Batter
Preheat your oven to 350°F. In a large mixing bowl, whisk together the 1.5 cups all-purpose flour, 1.5 teaspoons baking powder, 1.5 teaspoons ground cinnamon, 0.5 teaspoon ground nutmeg, and 0.5 teaspoon salt. Set this dry mixture aside. In a separate bowl, cream the 0.5 cup unsalted butter and 1 cup granulated sugar together until light and fluffy—about 3-4 minutes with an electric mixer.
Add the 2 whole eggs, one at a time, mixing well after each addition. Then stir in the vanilla extract. Gradually blend in the dry ingredients until just combined, being careful not to overmix. This ensures tender cakes rather than dense ones. The batter should be smooth with no visible flour streaks.
🍳 Step 3: Assemble the Spoon Cakes
Drop spoonfuls of the cake batter into 12 greased mini muffin cups, filling them about two-thirds full. Using a small spoon, place a teaspoon of the cooled apple filling in the center of each muffin cup. Then carefully add another spoonful of batter on top, covering the apple completely. This layering creates the signature apple surprise in the middle of each cake.
Here's where precision matters: tap the muffin tin gently on the counter to release any air bubbles and ensure even baking. Fill the muffin cups just to the top—they'll rise slightly during baking. I like to use a small offset spatula to smooth the tops for a pretty finish.
🔥 Step 4: Bake to Golden Perfection
Bake the spoon cakes in the preheated oven for 12-15 minutes, or until the tops are golden brown and a toothpick inserted into the center comes out clean. The cakes should spring back when gently pressed—they're done when they feel firm yet still tender. Watch closely after 12 minutes, as ovens vary in heat distribution.
Don't open the oven door during baking—this causes the cakes to sink. If you notice the tops browning too quickly, tent them loosely with aluminum foil. Once baked, let the cakes cool in the pan for 2 minutes, then transfer to a wire rack to cool completely. This resting period prevents them from falling apart when you remove them.
🍽️ Step 5: Dust and Serve
Once completely cooled, dust the tops of the cakes with 0.25 cup powdered sugar using a fine-mesh sieve. This adds a beautiful finishing touch and balances the warm spice flavors. Serve the apple spoon cakes at room temperature—they're perfect for tea time or as a delightful dessert.
Each bite reveals the surprise apple center, offering a perfect balance of tender cake and spiced apple filling. Store any leftovers in an airtight container for up to 3 days, though they're best enjoyed fresh. The contrast of the warm spices and the bright apple flavor makes these mini cakes truly special.
Pro Tips For Making Apple Spoon Cake
- Cream Butter First: Take the butter out of the fridge 30 minutes before mixing—cold butter will leave pockets of fat in your batter, making the cake dense. I learned this the hard way after a batch turned out like a brick.
- Sift Dry Ingredients: Whisk the flour, sugar, and baking powder together in a sieve before adding wet ingredients—this prevents lumps and ensures even baking. Skimping here leads to uneven texture, and no one wants a cake with dry spots.
- Don’t Overmix: Once the batter comes together, fold in the apples gently—just until combined. Overmixing develops gluten, turning your tender spoon cake into a chewy mess. Stop when the apples are evenly distributed, no more.
- Use Room-Temp Eggs: Crack eggs into a small bowl first to strain out any shells, then let them sit at room temp for 10 minutes before adding to the batter. Cold eggs can make the batter curdle, and no one wants a lumpy cake.
Storing and reheating your apple spoon cake
Room Temperature Storage
These apple spoon cakes taste best at room temperature, so store them in an airtight container with parchment paper between layers to prevent sticking. They'll keep beautifully for 3 days—the flavors actually deepen as the spices meld with the apples.
I like using glass containers with tight-sealing lids, like those from Pyrex, to maintain freshness. The powdered sugar topping stays crisp, but if it starts to look flat, simply dust with a little more before serving. 🍎
Freezer Preservation
For longer storage, freeze the cakes individually wrapped in parchment paper or plastic wrap to prevent moisture loss. Place them in a freezer-safe bag with all air squeezed out, then label with the date. They'll maintain their quality for up to 3 months.
When ready to serve, thaw at room temperature for 1-2 hours—no need for the microwave! The texture remains tender, though the apple filling might soften slightly. This makes them perfect for holiday prep or last-minute gatherings. ❄️
Reheating Tips
While these cakes are best served at room temperature, you can gently warm them if desired. Place individual cakes on a microwave-safe plate and heat for 10-15 seconds on 50% power. Alternatively, warm in a 200°F oven for 5 minutes to refresh the texture.
Avoid over-heating—they're delicate and can dry out quickly. The apple filling stays warm but retains its silky texture when reheated properly. 🔥
Serving Suggestions
Serve these cakes with a dollop of whipped cream or a sprinkle of toasted pecans for extra texture. For a festive touch, arrange them on a tiered stand with fresh berries or a dusting of cinnamon.
I often pair them with chai tea or sparkling apple cider to complement the spiced apple flavors. The contrast of warm spices and cool toppings makes each bite feel special. ✨
Make-Ahead Strategy
Prepare the cake batter and apple filling 1 day ahead—store them separately in the fridge. Assemble and bake the cakes just before serving for the freshest texture. If you're prepping for a party, bake the cakes the day before and store them in an airtight container at room temperature.
This allows the flavors to meld beautifully, making them even more delicious when served. It's a great way to save time while still delivering restaurant-quality results. 💡
Nutrition facts
Frequently asked questions
Can I use a different type of apple for this recipe?
While Granny Smith apples work best for their tartness and firm texture, you can try Honeycrisp or Fuji apples for a sweeter flavor. Just be sure to dice them small so they cook evenly inside the cakes. Avoid overly soft apples like Gala—they'll turn mushy during baking. The key is choosing apples that hold their shape when steamed.
How do I prevent the apple filling from leaking out?
Make sure your apple filling is thick enough by cooking it until the apples are tender but still hold their shape. The mixture should be spoonable, not runny. Also, when assembling, place the filling in the center of the batter and gently press down to create a seal. Bake immediately after assembling to prevent any shifting during baking.
Can I make these cakes without a muffin tin?
Yes! You can use a mini cake pan or even small ramekins. Just grease them well and use a small spoon to create the same layering technique. For a rustic look, try baking them in individual paper liners or even small phyllex cups. The baking time may vary slightly, so check for doneness after 10 minutes.
Why did my cakes turn out dense instead of tender?
Overmixing the batter is the most common cause of dense cakes. Mix just until the ingredients are combined—stop when you see no visible flour streaks. Also, make sure your butter and eggs are at room temperature. Cold ingredients can cause the cakes to become heavy. If you accidentally overmixed, try reducing the baking powder slightly next time.
Can I make these gluten-free?
You can adapt this recipe for gluten-free baking by substituting the all-purpose flour with a 1:1 gluten-free baking flour blend. Add an extra ½ teaspoon of xanthan gum to help with texture. Keep in mind the cakes may be slightly denser, but they'll still have that delicious apple surprise center. Test the recipe first with a small batch to check the consistency.